Affiliate Disclosure:Kid Sitting Safe is reader-supported. When you buy through links on our site, we may earn an affiliate commission at no additional cost to you. This does not influence our reviews or recommendations — we only recommend products we genuinely believe in.
Feeding children involves more than nutrition - safety plays a critical role in preventing choking, foodborne illness, and allergic reactions. This comprehensive guide covers essential food safety practices for parents and caregivers.
Every year, thousands of children experience preventable food-related incidents. According to the American Academy of Pediatrics, choking is a leading cause of injury and death among children under five, with one child dying from choking approximately every five days in the United States. Foodborne illnesses affect children more severely than adults due to their developing immune systems, while food allergies now affect roughly one in thirteen children. Understanding and implementing proper food safety measures can significantly reduce these risks while helping children develop healthy eating habits that last a lifetime. For a broader approach to keeping children safe at home, kitchen safety is just one piece of the babyproofing puzzle.
Choking Prevention
Choking occurs when food or other objects block the airway, preventing oxygen from reaching the lungs. Children under five are particularly vulnerable because they have smaller airways, developing chewing abilities, and a natural tendency to explore items with their mouths. Additionally, young children often become distracted during meals, may not chew food thoroughly, and lack the coordination to manage certain food textures effectively.
High-Risk Foods
Always Modify:
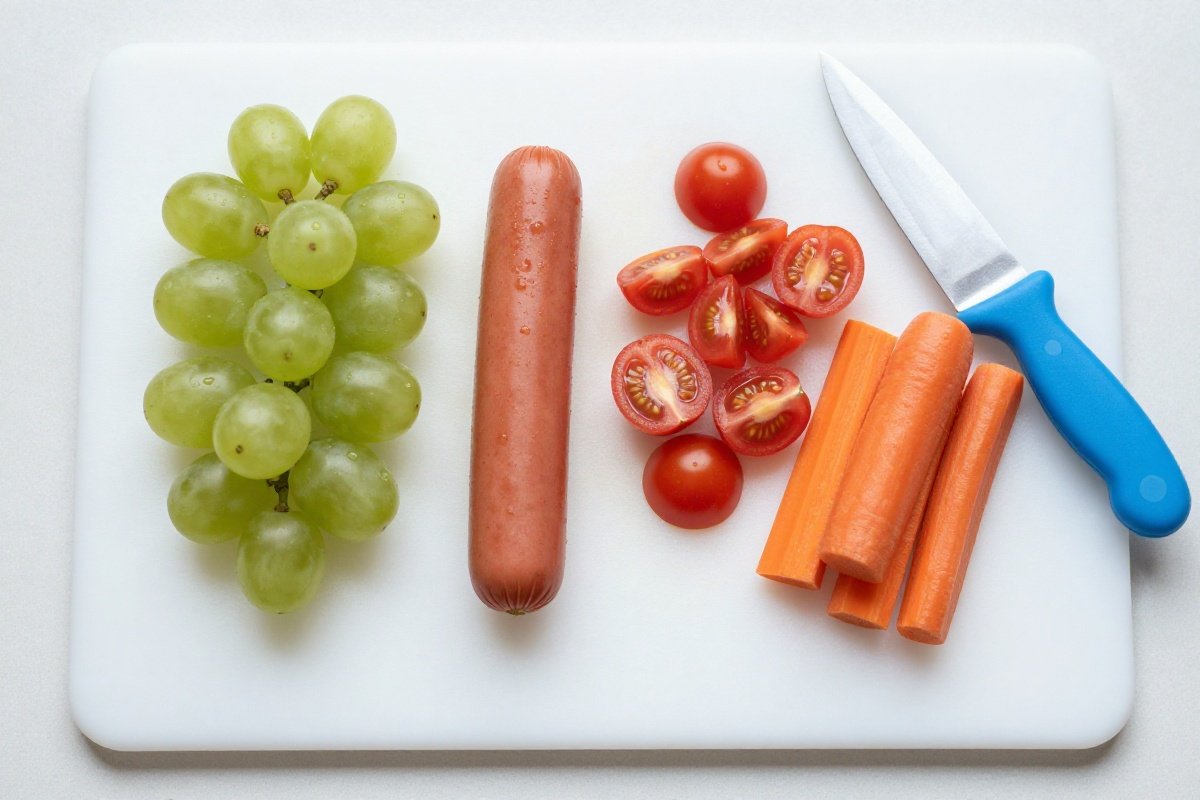
- Hot dogs: Cut lengthwise, then into small pieces
- Grapes/Cherry tomatoes: Quarter them
- Nuts/Seeds: Avoid whole until age 5
- Popcorn: Avoid until age 4
- Raw vegetables: Cook or cut into matchsticks
Beyond these common culprits, several other foods require careful attention. Hard candies and cough drops should be avoided entirely for children under four, as they’re perfectly sized to block small airways. Chunks of meat or cheese larger than 1/4 inch pose significant risk - always shred, mince, or cut these proteins into appropriate sizes. Whole grapes are particularly dangerous as their smooth, round shape allows them to form a perfect seal in a child’s throat; using tools like the OXO Tot Grape Cutter makes safe preparation quick and consistent. Peanut butter deserves special mention - while not a choking hazard when spread thinly on bread, spoonfuls of peanut butter can adhere to the throat and obstruct breathing. Always spread it thinly or mix it with applesauce or yogurt to thin the consistency. Similarly, marshmallows, especially the large campfire variety, should be avoided for young children or cut into small pieces for older kids.
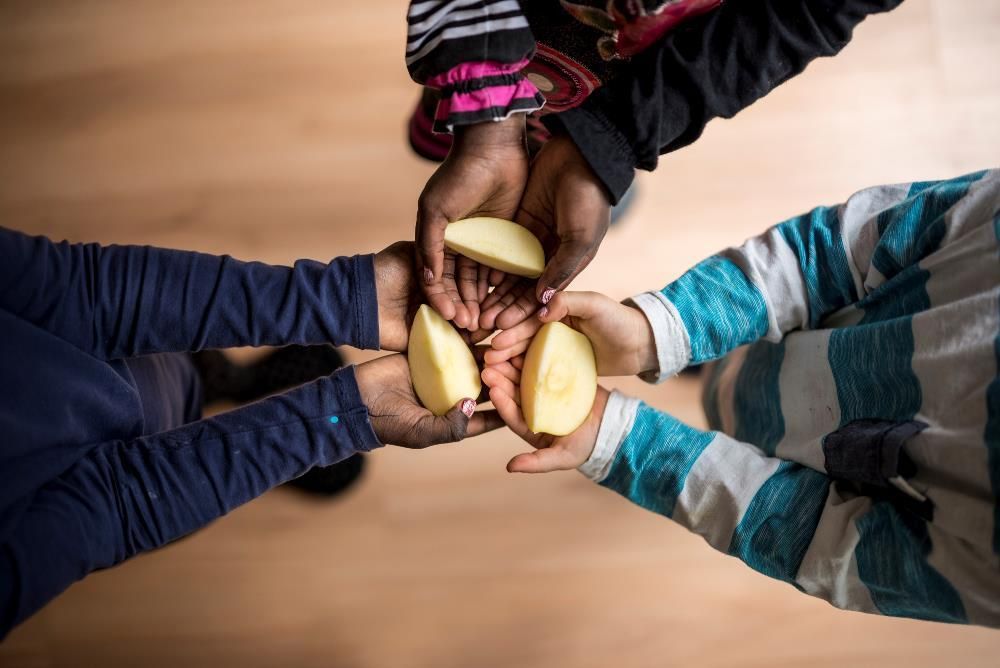
Raw apples and carrot sticks are healthy choices but require modification for young eaters. Grate raw apples or cook them until soft; steam or roast carrots until they can be easily pierced with a fork, then cut into matchsticks rather than rounds. Rice cakes and crackers should be offered with caution, as they can break into sharp pieces or clump together when mixed with saliva.
Age-Appropriate Preparation
| Age | Food Size | Examples |
|---|---|---|
| 6-12 months | Pureed or mashed | Smooth textures only |
| 1-2 years | 1/4-inch pieces | Soft, graspable foods |
| 2-3 years | Bite-size pieces | Age-appropriate cutting |
| 4+ years | Adult preparation | With supervision |
Understanding developmental milestones helps guide appropriate food preparation. Infants (6-9 months) are just beginning solid foods and should receive smooth purees or very soft foods that dissolve easily in the mouth. As they approach nine months, mashed foods with soft lumps help them learn to manage different textures. Introducing tools like NumNum GOOtensils during this phase supports safe self-feeding development while reducing risks. Older infants (9-12 months) develop a pincer grasp and can handle small, soft pieces. Offer foods cut into pieces no larger than 1/4 inch, focusing on naturally soft options like ripe banana, well-cooked pasta, or shredded chicken. The texture should be soft enough to mash between your fingers with minimal pressure.
Toddlers (1-2 years) have more teeth and better chewing skills but remain at high risk for choking. They’re also increasingly independent and may resist help during meals. Continue offering foods in 1/4-inch pieces, ensuring meats are tender and moist. Avoid tough or chewy textures like steak or bagels unless properly modified.
Preschoolers (3-5 years) develop better chewing abilities and can handle more varied textures. However, they’re easily distracted and may rush through meals, especially when playing with friends. Continue supervising meals and reinforcing safe eating practices. By age four, most children can handle popcorn and whole nuts, though individual readiness varies.
School-age children (5+ years) generally manage adult food textures, but supervision remains important. They may take large bites, talk while eating, or eat quickly, particularly in social settings. Reinforce the importance of sitting during meals, taking small bites, and chewing thoroughly.
Eating Environment
Safety Rules:
- Children sit while eating (no walking/running)
- Supervise all meals and snacks
- No eating in car seats while moving
- Encourage thorough chewing
The eating environment significantly impacts choking risk. Posture matters tremendously - children should sit upright in a chair or high chair with feet supported, not reclining, lying down, or sitting in bouncy seats. Proper positioning allows gravity to assist swallowing and helps children focus on the physical task of eating.
Eliminate distractions during meals. Turn off television, remove tablets and toys from the eating area, and minimize other activities that might divert attention from chewing and swallowing. Children who are laughing, crying, or talking while food is in their mouths face increased choking risk.
Vehicle safety deserves special emphasis. If your child is in a car seat, eating while restrained poses additional choking risks since the harness limits a caregiver’s ability to respond quickly. Never allow children to eat while a vehicle is moving, even for short trips. Sudden stops, bumps, or turns can cause food to lodge in the airway. If you must provide snacks during travel, pull over completely and supervise eating while the vehicle is stationary. Reserve car snacks for older children and choose low-risk options like applesauce pouches or soft crackers.
Mealtime atmosphere should balance calm and pleasant. Rushed meals increase choking risk as children may not chew properly. Allow adequate time for eating without pressure to finish quickly. However, excessively long mealtimes where children are grazing for hours can lead to distraction and unsafe eating practices. Aim for structured meal and snack times lasting 20-30 minutes.
Sibling considerations are important in multi-child households. Older siblings may share inappropriate foods with younger children or engage in behaviors that encourage unsafe eating. Establish clear rules about food sharing and model safe eating practices for all children to observe.
Safe Food Temperatures
Temperature control is one of the most critical aspects of preventing foodborne illness in children. Young children’s immune systems are still developing, making them more susceptible to food poisoning and its complications. Understanding proper temperature guidelines helps protect children from harmful bacterial growth.
Reheating Guidelines
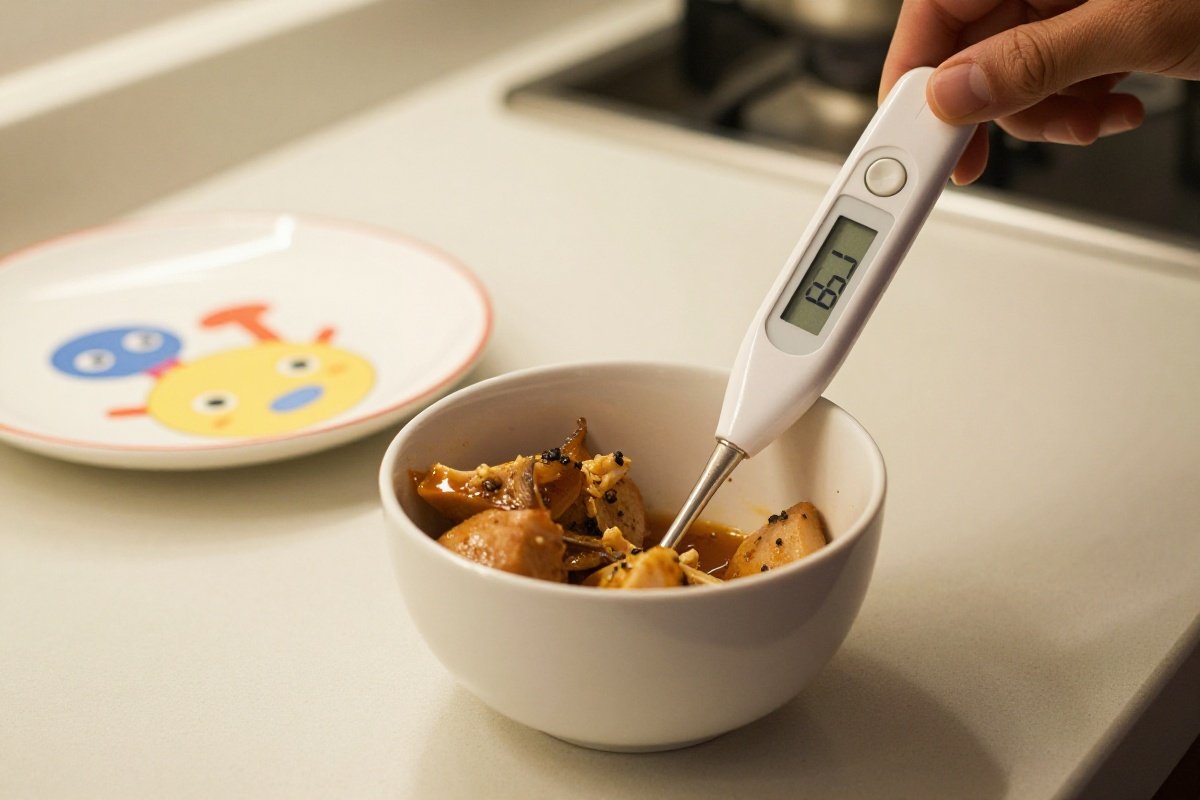
- Previously cooked foods: Reheat to 165°F internal temperature
- Baby food: Warm to body temperature (98-100°F)
- Bottles: Never microwave - use warm water bath
Thorough reheating kills harmful bacteria that may have developed during storage. Use a food thermometer to verify that leftovers reach 165°F throughout, not just on the surface. When reheating in the microwave, stir food thoroughly and let it stand for two minutes to eliminate hot spots before checking temperature. Always test a small amount yourself before serving to children.
Baby food warming requires special care. While many babies accept room-temperature food, warming makes it more palatable and can help release flavors. Heat only the portion you’ll serve immediately - never warm an entire jar and return unused portions to the refrigerator, as this introduces bacteria from the spoon. Place baby food containers in warm water for several minutes or heat briefly in the microwave, stirring thoroughly and testing temperature on your wrist before serving.
Bottle warming presents unique safety concerns. Microwaving bottles creates dangerous hot spots that can burn a baby’s mouth even when the bottle exterior feels fine. Instead, place bottles in a bowl of warm water for 5-10 minutes or use a bottle warmer designed for this purpose. Shake well and test temperature by dripping milk onto your inner wrist - it should feel neutral, neither hot nor cold.
Steam hazards deserve mention - when removing lids or plastic wrap from heated foods, do so carefully and away from children to prevent steam burns. Allow foods to cool slightly after heating before serving, especially foods that retain heat well like oatmeal or pasta.
Temperature Danger Zone
Bacteria multiply rapidly between 40°F and 140°F. Minimize time food spends in this range.
Understanding bacterial growth helps prevent foodborne illness. Pathogenic bacteria can double in number every 20 minutes in the danger zone, transforming safe food into a health hazard within hours. Common culprits include Salmonella, E. coli, Listeria, and Staphylococcus aureus - all particularly dangerous for young children.
The two-hour rule is your primary defense: perishable foods should never remain at room temperature longer than two hours. This includes time spent cooling after cooking, sitting on the counter during food preparation, and remaining at the table during meals. When outdoor temperatures exceed 90°F, reduce this window to just one hour.
Cooling hot foods requires strategy. Large portions of hot food like soups or casseroles won’t cool quickly enough in the refrigerator and may raise the internal temperature of your appliance, endangering other stored foods. Instead, divide large quantities into shallow containers (no deeper than 2 inches) to promote rapid cooling. You can also place containers in an ice bath, stirring occasionally, before refrigerating.
Thawing safety is equally important. Never thaw food on the counter - this allows the outer portions to enter the danger zone while the interior remains frozen. Safe thawing methods include refrigerator thawing (plan ahead - this takes time), cold water thawing (in a sealed bag, changing water every 30 minutes), or microwave thawing (cook immediately after). Foods can also be cooked from frozen, though this requires longer cooking times.
Buffet and party considerations present challenges. When hosting parties or holiday gatherings, keep hot foods hot (above 140°F) in slow cookers or chafing dishes and cold foods cold (below 40°F) on ice. Replace food platters regularly rather than adding fresh food to old, and discard items that have been sitting out too long.
Storage Limits
| Location | Maximum Storage |
|---|---|
| Room temperature | 2 hours (1 hour if above 90°F) |
| Refrigerator (40°F) | 3-4 days for cooked foods |
| Freezer (0°F) | 1-3 months for baby food |
Refrigerator organization impacts food safety. Set your refrigerator to 40°F or below and use a refrigerator thermometer to verify temperature. Store raw meats on the bottom shelf in sealed containers or on plates to prevent drips from contaminating other foods. Keep ready-to-eat foods like cut fruit, yogurt, and leftovers on upper shelves.
Specific storage guidelines vary by food type. Cooked poultry and meat remain safe for 3-4 days when properly refrigerated. Lunch meats last 3-5 days after opening. Cooked pasta and rice should be used within 3-4 days. Cut fresh fruit stays fresh for 3-4 days, while whole fruits vary - berries last just a few days while apples keep for weeks.
Baby food storage demands extra caution due to infants’ vulnerability to foodborne illness. Opened commercial baby food jars should be refrigerated and used within 2-3 days. Homemade baby food lasts 24-48 hours in the refrigerator or can be frozen for 1-3 months in ice cube trays or small containers. Label everything with preparation dates.
Freezer management extends food life but requires proper technique. Use freezer-safe containers or bags, removing as much air as possible to prevent freezer burn. Label all items with contents and date. While freezing keeps food safe indefinitely, quality deteriorates over time. For baby food, use frozen portions within 1-3 months for best quality.
Formula and breast milk follow special rules. Prepared formula must be used within two hours if left at room temperature or within 24 hours if refrigerated. Breast milk can be refrigerated for up to four days or frozen for 6-12 months. Never refreeze thawed milk, and use the oldest milk first.
Allergen Introduction
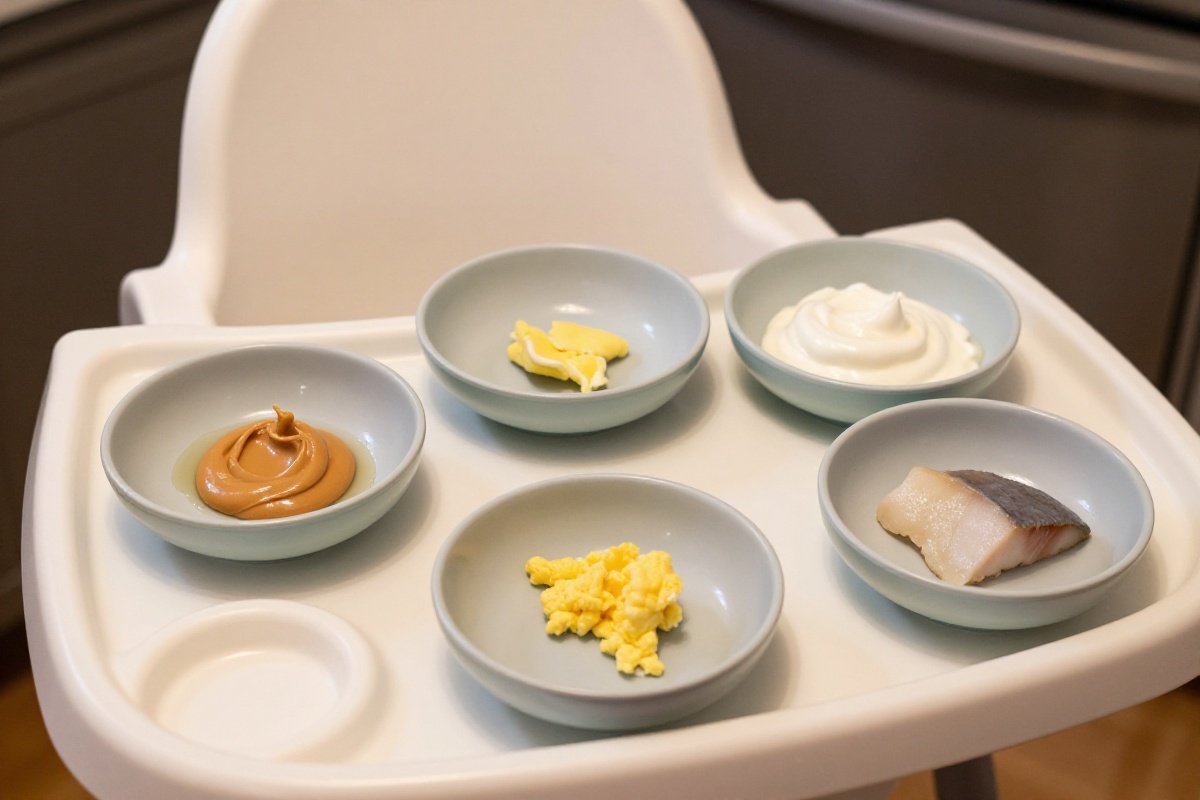
Food allergies affect approximately 8% of children and are becoming increasingly common. Early introduction of allergenic foods, contrary to previous recommendations, may actually reduce allergy risk. Current research supports introducing common allergens around six months of age when babies begin solid foods.
Current Guidelines
Introduce allergenic foods around 6 months when solids begin:
- Peanuts and tree nuts
- Eggs
- Dairy
- Wheat
- Soy
- Fish and shellfish
The timing shift represents a significant change in medical guidance. Previously, parents were advised to delay allergenic foods until age one, two, or even three. Research, particularly the landmark LEAP study on peanut allergies, demonstrated that early introduction significantly reduces allergy development in most children. The American Academy of Pediatrics now recommends introducing these foods around six months, after a baby has tried a few less-allergenic first foods.
High-risk infants with severe eczema or existing food allergies should consult an allergist before introducing peanut products, as they may need supervised introduction or allergy testing first. For most children, however, introducing allergenic foods at home is safe and recommended.
Form matters when introducing allergens. For peanuts, mix smooth peanut butter with warm water, breast milk, or formula to create a thin consistency, or use peanut powder designed for infant feeding. Never offer whole nuts, chunks of nut butter, or foods that present choking hazards. For tree nuts, use smooth nut butters similarly thinned. For eggs, start with well-cooked eggs mixed into other foods. For fish, ensure bones are removed and fish is thoroughly cooked and flaked.
Sesame is now recognized as the ninth major allergen in the United States as of 2023. Introduce it through tahini thinned with water or breast milk, or hummus for older babies who handle thicker textures.
Safe Introduction Protocol
- Timing: Offer in morning at home
- Amount: Start with 1/4 teaspoon
- Observation: Monitor 3-5 days before next new food
- Response: Watch for hives, vomiting, breathing difficulty
Morning introduction provides maximum observation time should a reaction occur. Avoid introducing new foods at dinner or before bed when you might miss early symptoms. Ensure your child is otherwise healthy - postpone new foods if they’re ill, have a diaper rash, or are experiencing eczema flares that might mask or confuse allergic reactions.
Starting small allows you to gauge response without overwhelming your child’s system. After confirming tolerance with 1/4 teaspoon, gradually increase the amount over several days. Once established as safe, incorporate the food regularly into your child’s diet - consistent exposure is key to maintaining tolerance.
Waiting periods between new allergens allow you to identify which food caused a reaction should one occur. While you can introduce multiple non-allergenic foods more quickly, space out the major allergens. Some families introduce one new allergen weekly, while others feel comfortable with twice weekly introduction.
Regular inclusion after successful introduction is crucial. Research suggests that regular consumption of allergenic foods helps maintain tolerance. After introducing peanuts, for example, aim to include them in your child’s diet 2-3 times weekly rather than offering them once and then avoiding them for weeks.
Documentation helps track introduction progress. Keep a simple log noting which foods were introduced, when, and any reactions observed. This information proves valuable for pediatrician visits and helps ensure all major allergens are systematically introduced.
Emergency Response
Call 911 immediately for:
- Difficulty breathing
- Swelling of face or throat
- Severe vomiting or diarrhea
- Loss of consciousness
Recognizing anaphylaxis can save your child’s life. This severe, potentially life-threatening allergic reaction typically occurs within minutes to two hours of exposure. Symptoms may include difficulty breathing, wheezing, swelling of the face or lips, widespread hives, repetitive vomiting, pale or blue skin, dizziness, or loss of consciousness. The reaction can progress rapidly, so immediate action is essential.
Epinephrine administration is the first-line treatment for anaphylaxis. If your child has been prescribed an epinephrine auto-injector, administer it at the first signs of a severe reaction - don’t wait to see if symptoms worsen. Call 911 immediately after administering epinephrine, as a second dose may be needed and medical observation is required. Even if symptoms improve, emergency care is necessary as reactions can be biphasic, with symptoms returning hours later.
Mild reactions like localized hives around the mouth or mild stomach upset don’t necessarily indicate true allergy and may represent contact sensitivity or oral allergy syndrome. However, contact your pediatrician to discuss these symptoms and determine appropriate next steps. Don’t offer the food again without medical guidance.
Distinguishing from other conditions can be challenging. Food protein-induced enterocolitis syndrome (FPIES) causes severe vomiting and diarrhea, typically 2-4 hours after eating the trigger food, without typical allergic symptoms like hives. Eosinophilic esophagitis causes difficulty swallowing and food getting stuck but isn’t an immediate emergency. Discuss any concerning symptoms with your healthcare provider.
Kitchen Hygiene
Proper kitchen hygiene forms the foundation of food safety, preventing the spread of harmful bacteria, viruses, and parasites that cause foodborne illness. Children are particularly vulnerable to these pathogens due to their developing immune systems.

Hand Washing
- Before food preparation
- After handling raw meat/eggs
- After using the bathroom
- After touching pets
Proper Technique: 20 seconds with soap and warm water
Effective handwashing requires more than a quick rinse. Wet hands with clean running water, apply soap, and lather thoroughly, scrubbing all surfaces including backs of hands, between fingers, and under nails. Continue for at least 20 seconds - singing “Happy Birthday” twice provides the right timing. Rinse thoroughly under running water and dry with a clean towel or air dryer.
Teaching children to wash hands properly takes patience and modeling. Make handwashing fun for young children with colorful soaps, step stools to reach sinks, and timers or songs to ensure adequate duration. Supervise handwashing until children demonstrate proper technique consistently, typically not until age 5-6.
Critical moments for handwashing extend beyond the obvious. Wash hands after touching garbage, handling mail or packages, blowing your nose, caring for someone who’s ill, and after any activity that might transfer germs to food. If you touch your face, hair, or phone while cooking, wash hands again before continuing food preparation.
Hand sanitizer serves as a backup but shouldn’t replace handwashing in food preparation contexts. When washing isn’t immediately available, use sanitizer with at least 60% alcohol content. However, sanitizer doesn’t remove visible dirt or grease and is less effective against certain pathogens like norovirus. Always wash hands with soap and water when available.
Cross-Contamination Prevention
- Separate cutting boards for raw meat and produce
- Wash produce under running water
- Store raw meat on bottom refrigerator shelf
- Clean and sanitize surfaces regularly
Cutting board strategy prevents dangerous pathogen transfer. Maintain separate cutting boards for raw meat, poultry, and seafood versus ready-to-eat foods like bread, fruits, and vegetables. Color-coded boards simplify this system - for example, red for raw meat, green for produce. Alternatively, use one side of a reversible board for raw proteins and the other for produce, washing thoroughly between uses.
Board materials impact safety and maintenance. Plastic boards can go in the dishwasher for thorough sanitizing, making them ideal for raw meat preparation. Wood boards have natural antimicrobial properties but require careful hand washing and thorough drying. Replace cutting boards when they become heavily scarred or impossible to clean effectively, as grooves harbor bacteria.
Produce washing removes dirt, pesticide residues, and potential pathogens. Rinse all fruits and vegetables under running water, even those you’ll peel. Use a clean produce brush for firm produce like melons and cucumbers. Dry with a clean cloth or paper towel. Skip produce washes or soaps - plain water is most effective and won’t leave residues. For leafy greens, separate leaves and rinse thoroughly, as dirt and bacteria hide in crevices.
Raw meat handling requires extra vigilance. After cutting raw meat, poultry, or seafood, immediately wash the cutting board, knife, and any surfaces the meat contacted with hot, soapy water. Better yet, sanitize these items with a diluted bleach solution (1 tablespoon unscented liquid bleach per gallon of water) or run them through the dishwasher. Never place cooked meat back on an unwashed plate that held raw meat.
Counter sanitizing should occur regularly throughout meal preparation, not just at the end. Clean spills immediately, particularly those involving raw meat juices. After washing surfaces with hot, soapy water, follow with a sanitizing solution. Commercial kitchen sanitizers work well, or make your own bleach solution as described above. Allow the solution to sit for at least one minute before rinsing or air drying.
Sponges and dishcloths harbor millions of bacteria and require special attention. Sanitize sponges daily by microwaving them damp for one minute or running them through the dishwasher. Replace sponges weekly or when they smell musty. Wash dishcloths in hot water after each use, using bleach for white cloths. Never use the same cloth for dishes, hands, and surfaces - designate separate towels for each purpose.
Special Dietary Considerations
Every family’s nutritional approach differs based on cultural traditions, health requirements, ethical beliefs, and medical needs. Understanding how to safely implement various dietary patterns ensures children receive adequate nutrition while maintaining food safety.
Vegetarian and Vegan Diets
Protein Sources:
- Beans and lentils (properly cooked and mashed)
- Tofu and tempeh (age-appropriate textures)
- Nut butters thinned with water (spread thinly)
- Quinoa and whole grains
Nutrient Considerations:
- Iron-fortified cereals
- Vitamin B12 supplementation (if vegan)
- Calcium from fortified plant milks
- Omega-3 from ground flax or chia
Planning vegetarian diets for children requires attention to complete nutrition. While well-planned vegetarian and vegan diets can support healthy growth, they require more intentional food selection than omnivorous diets. Work with a pediatric dietitian, especially for vegan diets, to ensure your child receives adequate calories, protein, iron, calcium, vitamin D, vitamin B12, zinc, and omega-3 fatty acids.
Protein quality matters for growing children. Complete proteins contain all nine essential amino acids, found in animal products, quinoa, soy, and combinations of complementary plant proteins. Offer various protein sources throughout the day - beans with rice, hummus with whole grain bread, or peanut butter with whole grain crackers. Young children on vegetarian diets may need more frequent meals and snacks to meet caloric needs from less dense plant foods.
Iron absorption requires strategy, as plant-based iron (non-heme iron) absorbs less readily than animal-based iron. Boost absorption by pairing iron-rich foods with vitamin C sources - serve beans with tomatoes, fortified cereal with strawberries, or lentils with bell peppers. Avoid serving iron-rich meals with dairy, as calcium inhibits iron absorption.
Vitamin B12 is essential for brain development and is naturally found only in animal products. Vegans must use fortified foods or supplements. Check that plant milks, nutritional yeast, or cereals are fortified with B12, or give your child a pediatrician-recommended B12 supplement. Even vegetarians who consume dairy and eggs may need supplementation if intake is low.
Calcium sources for dairy-free children include fortified plant milks, calcium-set tofu, dark leafy greens, almonds, tahini, and fortified orange juice. Children need 700-1300mg daily depending on age. Check labels on plant milks - not all are fortified, and fortification levels vary. Shake well before serving, as calcium settles.
DHA omega-3 fatty acids support brain development. While walnuts, flaxseeds, and chia seeds provide ALA omega-3s, children’s bodies inefficiently convert these to the essential DHA form. Consider algae-based DHA supplements, especially for vegan children, or DHA-fortified foods.
Organic vs. Conventional Foods
The Dirty Dozen: Prioritize organic for: strawberries, spinach, kale, nectarines, apples, grapes, peaches, cherries, pears, tomatoes, celery, potatoes
The Clean Fifteen: Conventional is acceptable for: avocados, sweet corn, pineapple, onions, papaya, frozen sweet peas, eggplant, asparagus, cauliflower, cantaloupe, broccoli, mushrooms, cabbage, honeydew melon, kiwi
The organic debate involves weighing pesticide exposure, nutritional content, environmental impact, and budget constraints. While organic produce contains fewer pesticide residues, conventional produce is heavily regulated and thoroughly tested for safety. Both organic and conventional fruits and vegetables provide essential nutrients that benefit children’s health.
Pesticide concerns focus on potential health effects from long-term exposure to residues. Children may be more vulnerable due to their smaller size, faster metabolism, and developing systems. However, the health benefits of eating plenty of fruits and vegetables - whether organic or conventional - far outweigh theoretical risks from pesticide residues when produce is properly washed.
Budget-friendly strategies make organic food more accessible. Parents on a tight budget can also find helpful advice in our baby bump on a budget guide for managing costs from pregnancy through early childhood. Buy organic versions of the “Dirty Dozen” - foods that typically have higher pesticide residues - while choosing conventional options for the “Clean Fifteen.” Shop seasonally when organic prices drop, visit farmers’ markets toward closing time for deals, and buy frozen organic produce for year-round affordability.
Washing and peeling reduce pesticide residues significantly. Rinse all produce under running water, scrubbing firm items with a brush. Peeling removes surface residues but also eliminates fiber and nutrients found in skins. For the greatest pesticide reduction while preserving nutrition, wash thoroughly and peel when the skin isn’t typically eaten.
Organic meat and dairy considerations involve antibiotic use, hormone treatment, and animal welfare in addition to pesticide exposure from feed. Organic animal products come from animals not given antibiotics or growth hormones and fed organic feed. For families unable to afford all-organic animal products, prioritize organic dairy for young children who consume large quantities, as it provides cleaner fat sources.
Teaching Food Safety
Food safety education empowers children to make safe choices independently as they grow. Age-appropriate lessons build lifelong habits while respecting developmental stages.
Age-Appropriate Education
Toddlers (2-3 years):
- Simple rules: “Sit down to eat”
- “Wash hands before food”
- “Hot” and “cold” concepts
Preschoolers (4-5 years):
- Why we wash hands
- Basic kitchen safety boundaries
- Simple food prep participation
School Age (6+ years):
- Germ concepts
- Reading food labels
- Participating in meal preparation
- Understanding allergies
Toddler learning centers on establishing foundational routines through repetition and simple explanations. Use concrete, action-based language: “We sit while we eat so food doesn’t get stuck,” rather than abstract concepts about choking. Make handwashing a non-negotiable routine before meals and after bathroom use, turning it into a fun ritual with songs or special soap. Teach “hot” and “cold” to help them identify potential dangers, though supervision remains essential.
Preschool education builds on established routines with simple explanations of “why.” Introduce basic germ concepts: “Washing hands removes germs too tiny to see that can make us sick.” Establish clear kitchen boundaries - “The stove is only for grown-ups” or “We ask before opening the refrigerator.” Allow supervised participation in safe tasks like washing vegetables or stirring, connecting food safety to helping prepare family meals.
Early elementary lessons introduce more complex concepts while building practical skills. Explain how germs spread and cause illness, why some people have food allergies and need special care, and how reading labels helps us know what’s in food. Teach proper handwashing technique, basic food storage concepts, and the importance of checking dates on perishable items. Children this age can begin learning to pack their own school lunches with supervision.
Older elementary children (ages 8-10) can understand more sophisticated food safety principles. Discuss cross-contamination, safe food temperatures, and proper defrosting methods. Teach them to identify spoiled food by appearance and smell. Introduce safe knife skills with appropriate tasks, proper handwashing after touching pets or using the bathroom, and how to read ingredient labels for allergens if they or classmates have allergies.
Preteen and teen education prepares children for eventual independence. At this age, children may be babysitting for others, making food safety knowledge especially practical. Teach safe cooking temperatures, proper food storage times, when to throw food away, and how to handle emergencies. Discuss making safe choices when eating away from home, food safety during sports practices and games, and safe food handling for babysitting jobs. Emphasize that food safety rules aren’t just family preferences but universal principles protecting health.
Kitchen Participation
Safe Tasks by Age:
- 2-3 years: Washing produce, stirring, tearing lettuce
- 4-5 years: Measuring ingredients, cracking eggs, spreading
- 6+ years: Cutting soft foods with supervision, using stove with help
Cooking with toddlers requires realistic expectations and close supervision. Set up a learning tower or sturdy step stool so they can safely reach counter height. Assign tasks with immediate, visible results: washing fruits and vegetables in a bowl of water, tearing lettuce for salad, or sprinkling cheese on pizza. Accept that these tasks will take longer and create messes - the goal is building interest and foundational skills.
Preschool participation expands to tasks requiring simple coordination. Children can measure pre-portioned ingredients, crack eggs into bowls (expect shells), spread soft toppings, mix batters, and arrange items on plates. They enjoy using child-safe tools like plastic knives for cutting very soft items like bananas or cooked sweet potatoes. Provide clear, simple instructions one step at a time.
Early elementary cooking introduces techniques requiring more precision. With supervision, children can cut soft foods using appropriate knives, measure ingredients using measuring cups and spoons, knead dough, shred lettuce, and follow simple recipes. Begin teaching proper knife grip, cutting techniques on a stable board, and carrying knives safely. Start with softer items before progressing to harder vegetables.
Older elementary chefs (ages 8-10) can manage increasingly complex techniques. Teach safe stove use with close supervision - starting burners, adjusting temperatures, and using oven mitts properly. Show them how to safely drain hot pasta using a colander, flip items in pans, and test food temperatures. Emphasize never leaving cooking food unattended and turning pot handles inward.
Teen independence builds toward complete meal preparation. Supervise gradually less as they demonstrate consistent safe practices. Teach them to brown meat properly, use sharp knives efficiently and safely, multitask during meal preparation, and clean as they cook. Discuss adapting recipes, substituting ingredients appropriately, and planning complete balanced meals. Many teens can prepare entire family dinners independently by age 14-15 with proper instruction.
Safety rules remain constant regardless of age. Always supervise children in the kitchen, maintain clear boundaries around hot surfaces and sharp objects, establish a “kids out of the kitchen” signal for handling boiling water or removing items from the oven, and teach children to ask for help when unsure. Make handwashing before cooking non-negotiable, and never allow children to cook when tired, rushed, or distracted.
Further Reading
- Bike Safety for Kids: Helmets, Gear & Rules Guide
- Safety Games for Kids: Teaching Protection Through Play
- Child Safety at Home: Complete Babyproofing Guide 2026
When to Seek Medical
Recommended Products
OXO Tot Grape Cutter
Best grape cutterEssential tool for safely preparing grapes and cherry tomatoes.
What We Like
- Quickly quarters grapes and cherry tomatoes to reduce choking hazards
- Simple one-handed operation for fast food prep
- Top-rack dishwasher safe for easy cleaning
- Soft grip handles for comfortable use
- Works with grapes, cherry tomatoes, and similar small foods
What We Don't
- Single-purpose tool with limited versatility
- Still requires adult supervision during meal time
- May not work well with very small or very large grapes
NumNum GOOtensils
Best baby spoonsBest first spoons for safe self-feeding introduction.
What We Like
- Flat design makes scooping purees easy
- No right or wrong way to hold
- Soft silicone is gentle on gums
- Great for baby-led weaning introduction
What We Don't
- Best suited for purees and soft foods only
- Children typically outgrow by 12-18 months
Sources & Research
Continue Reading
Explore more child safety content or browse our other categories.
Frequently Asked Questions
- What foods are most common choking hazards for children?
- The most common choking hazards for young children include: hot dogs (cut lengthwise then slice), grapes and cherry tomatoes (quarter them), nuts and seeds (avoid whole until age 5), popcorn (avoid until age 4), hard candies and gum (avoid entirely), chunks of meat or cheese (dice to 1/4 inch), peanut butter (spread thinly, avoid spoonfuls), and raw vegetables like carrots (cook or cut into matchsticks). Round, firm, slippery foods pose the greatest risk because they can completely block airways. Always supervise eating, ensure children sit while eating (not walking/running), and cut foods to appropriate sizes. Learn infant and child CPR in case of choking emergencies. The American Academy of Pediatrics provides detailed guidance on food preparation by age.
- At what temperature should I reheat food for my child?
- Reheat all previously cooked foods to an internal temperature of 165°F (74°C) to kill harmful bacteria. Use a food thermometer to verify. For baby food, warm to body temperature (around 98-100°F) to prevent mouth burns. Always stir food thoroughly after heating to eliminate hot spots. Test temperature on your wrist before feeding - if it feels warm to you, it's safe for baby. Never microwave breast milk (creates hot spots, destroys nutrients). Warm bottles in hot water or a bottle warmer instead. When reheating in microwave, let food stand for 1-2 minutes after heating, then stir and test temperature. Discard any food that's been at room temperature for more than 2 hours (1 hour if above 90°F ambient temperature).
- How do I introduce allergenic foods safely?
- Current guidelines recommend introducing allergenic foods (peanuts, eggs, dairy, wheat, soy, fish, shellfish, tree nuts) around 6 months when other solids begin, rather than delaying. Introduce one new food at a time, waiting 3-5 days before adding another to monitor for reactions. Offer a small amount initially (1/4 teaspoon), then gradually increase if no reaction. Give the food at home (not at daycare/restaurants) in the morning when you'll be available to monitor. Signs of allergic reaction include: hives, vomiting, coughing/wheezing, swelling of face/lips, or difficulty breathing. If severe symptoms occur, call 911. For children with severe eczema or existing food allergies, consult an allergist before introduction. Recent studies show early introduction may actually prevent allergies.
- What kitchen hygiene practices are essential with kids?
- Essential kitchen hygiene practices: Wash hands with soap for 20 seconds before food prep and after handling raw meat, eggs, or using the bathroom. Use separate cutting boards for raw meat and ready-to-eat foods. Wash all fruits and vegetables under running water (no soap needed). Keep raw meat on bottom refrigerator shelf to prevent drips onto other foods. Refrigerate perishable foods within 2 hours (1 hour if above 90°F). Keep refrigerator at 40°F or below, freezer at 0°F. Clean and sanitize counters and high chairs after each use. Don't share spoons or taste-test baby's food with the same spoon (transfers bacteria). Replace sponges frequently or use washable dishcloths. Teach children to wash hands before eating and avoid touching faces during food prep.
- How long can I store homemade baby food?
- Homemade baby food storage guidelines: Refrigerator (40°F or below) - store for 24-48 hours maximum. Freezer - purees last 1-3 months at 0°F, though best quality within 1 month. Label containers with date and contents. Freeze in ice cube trays (1-2 oz portions) for easy thawing. Thaw in refrigerator overnight or under cold running water - never at room temperature. Once thawed, use within 24 hours. Never refreeze thawed baby food. For commercial baby food, follow "use within 24-48 hours after opening" guidelines on the label. When in doubt, throw it out - babies' immune systems are developing and more vulnerable to foodborne illness. Discard any food that smells off, shows mold, or has been at room temperature too long.
Written By
Kid Sitting Safe
Our team researches car seat safety standards, crash test data, and real-world usability to help parents make the safest choice.
Related Articles

Bike Safety for Kids: Helmets, Gear & Rules Guide
Essential bike safety guide for kids. Learn proper helmet fit, safety gear recommendations, road rules, and how to prevent common cycling injuries.

Child Safety at Home: Complete Babyproofing Guide 2026
Comprehensive guide to child safety at home. Learn essential babyproofing tips for every room, accident prevention, and creating a safe environment for your family.

How to Put a Car Seat in a Shopping Cart: Safety Guide
Learn safe ways to use car seats with shopping carts. Understand the risks, proper positioning, and alternatives for shopping with infants.